
It goes without saying that every digital marketer is strapped for time.
But blogging is one of those tasks that you just have to keep on top of – which is often easier said than done.
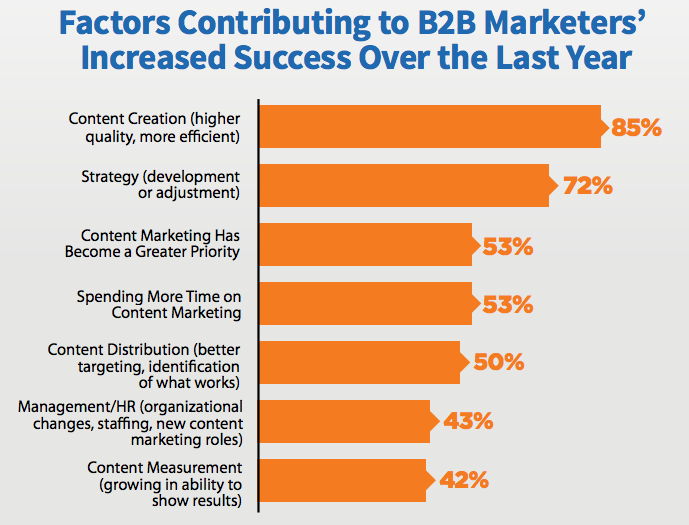
According to the latest research in content marketing, creating high-quality content efficiently is the number one factor for success.
 Luckily, there are some ways to speed up the blogging process. One of the easiest and most effective methods is what I like to call ‘batching’.
Why should you batch your blogging process? Well, there are two major benefits:
- You can delegate or outsource each manageable chunk.
- You can work quicker and more productively.
So what exactly is batching?
Batching is very similar to the productivity concept of ‘chunking’, often called ‘deep work’. It helps you maintain a laser-like focus on one specific task and not get distracted.
Cal Newport, who coined the term ‘deep work’, blames distractions for lagging productivity in the business world. From social media to email, your smartphone to TV set, the world is full of distractions that demand our attention and keep us from getting things done.
“Deep work is when you focus without distraction on a cognitively demanding task,” Newport told Entrepreneur in 2016. “You work on it as hard as your brain is capable for an extended amount of time without any distractions.”
Blog posts, by their very nature, have a lot of component parts that can distract you from the task at hand. For example, you might try to conduct subject research but find yourself getting sidetracked by plugging title ideas into your favorite headline generator.
The danger is that working on several parts at once can make the overall process take longer.
How do I batch my blogging process?
Well, you begin by breaking everything you need to get done into sizeable chunks.
Let’s say you were about to bake a batch of blueberry muffins. You’d take a step-by-step approach, right?
Now, let’s say you want to post weekly to your blog. Most bloggers would think of each post as an independent task that involves coming up with a blog idea, doing research, creating a blog structure, writing, revising and publishing. Then repeating the same process again the following week.
However, if you break this process down into its component parts and tackle each component individually, you have a recipe for success (but not blueberry muffins. You can find one of those here).
Here’s how you can break each different stage down into manageable chunks.
1. Coming up with blog ideas
Coming up with blog post ideas can be pretty time-consuming. You need to think about your target audience, research your competitors, check out what’s already been written, and come up with a unique twist on a relatable topic.
I recommend setting aside a couple of hours every week specifically to come up with ideas instead of doing it on a post-by-post basis. Make a spreadsheet of content ideas that you can come back to whenever you need or when inspiration strikes.
If you’re not feeling particularly creative during your allotted ‘brainstorming‘ time, try out some content idea generator tools. They can be pretty cool! For example, there’s Impact Blog Title Generator. Just type in your own keywords and it will generate hundreds of blog title ideas to work with.

Portent’s Content Idea Generator and Inbound Now’s Blog Title Idea Generator also help kill writer’s block, and there are many, many more options out there.
2. Conducting content research
Once you have a backlog of blog ideas to work with, you can start batching your research process.
One valuable strategy is to create a bank of statistics or a glossary of key terms. All great blog posts use statistics to back up their arguments so it makes sense to keep all of these handy in one place that’s easily accessible.
Think about your niche or industry and compile some key information. Next, start researching source material for each individual post you plan to write. Create a backlist of links to relevant sources for each blog idea – even if you haven’t written a word yet – so you can refer back to it when structuring your actual post.
Of course, research is always easier with the help of tools. Evernote is a great way to organize your research materials. You can save whole web pages, take notes and create tags to refer back to later on. Helpful!

3. Blog structuring
Because you’ve already done your topic brainstorming and subject research, it’s easy to sketch out several blog structures in a short period of time. These are just outlines where you plan out the basic argument you want to make in the order you want to make it.
Some people aren’t too keen on creating outlines… but in my opinion, it’s good to have something to help you stay on track with your writing. They’re also great if you ever happen to outsource your content writing, as you can stay in control of the post’s structure and basic flow while getting someone else to do the hard yards of writing it!
In addition, having a structure keeps you conscious that there’s an endpoint in mind. Creating several blog structures in advance really helps make you feel like you’re on top of your blogging process, and renders the task of writing each individual post far less arduous.
4. Writing
Ah, writing. One of the most dreaded parts of the blogging process, but undeservedly so. If you’ve already done a decent whack of research and created a blog structure, it can be lightning fast.
Sit down and focus on the intro, or, if you’re stuck on coming up with a snappy opening line, just move onto another chunk. For example, you might have listed ‘Paragraph 4 – draw in research from case studies’ in your blog structure. It’s often easier to write from statistical evidence when you’re really stuck – there’s something comforting about discussing someone else’s research. So work on that chunk for a bit, then move onto another.
Alternatively, if you’re feeling like the words are flowing and you’re having one of those magical ‘good’ writing days, don’t hold off drafting other posts just because you’ve finished one. Seize the mood and strike while the blogging iron is hot!
If you draft several posts in one sitting, then you can set them aside for future publishing dates.
5. Editing
Out of all the components of blogging, editing probably benefits the most from batching. So many bloggers are guilty of writing a draft, rushing excitedly through a proofread and then hitting ‘Publish’. Of course, the post is still riddled with errors.
I recommend creating a time gap between your initial drafting and your final proofread to ensure you get the opportunity to approach your content with fresh eyes. Not only will this help you catch grammar mistakes, but it will minimize mental fatigue, giving you an opportunity to tighten your writing even more.
It’s a good idea to do several ‘sweeps’ of a blog in the editing stage where you look for different things each time. These can include:
- Basic spelling and grammar errors
- Opportunities for inbound and outbound links
- Style and formatting inconsistencies
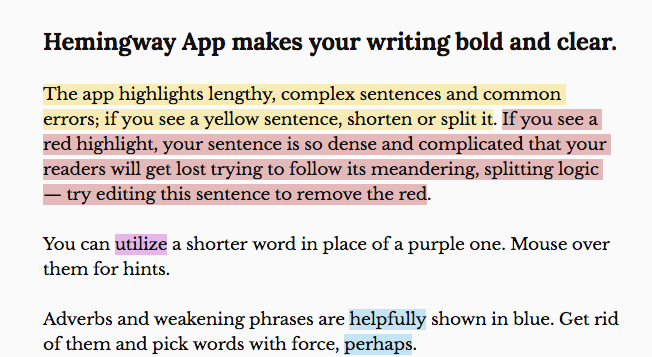
You can even throw your drafted blogs into Hemingway App or another online editing resource to clean up your writing the quick ‘n easy way. Hemingway automatically highlights problems in your writing and is great at picking up phrases you’ve overused or words you’ve repeated.
I also find it hugely beneficial to read my work aloud. Yes, it makes you feel a bit silly, but it’s a brilliant way to make mistakes leap out from the page and nail that conversational tone.
6. Adding the bells and whistles
By bells and whistles, I mean things like header images, SEO keywords, meta descriptions, visual assets and social sharing CTAs. Batching the bells and whistles can save you a whole lot of time.
Here’s an example of how to break it up into five manageable steps.
- Create graphics. Find two or three websites you like using to create graphics and stick to them. I like Canva. It’s free, and as well as creating graphics, you can maintain a bank of custom images, social graphics and more. This is handy for making sure the type of visual materials you use are consistent and in line with your blog’s aesthetic.
- Upload and optimize. After you upload the blog post to WordPress or your platform of choice, set your categories, fill out the title tags, alt tags, etc. Write your meta description and set your featured image. Then use a tool like Yoast or All In One SEO Pack to make sure you’ve covered all your SEO bases.
 Add CTAs. Next, add calls-to-action to remind readers to check out other related content on your site. Add ‘Click to Tweet’ phrases and any other social sharing CTAs you normally use.
- Do a visual and link check. Once you’ve added all the links your post needs, do a once-over to make sure all the links open in a new page and that the visual elements are all aligned. It goes without saying that every link you insert should work!
- Schedule the post. Lastly, either hit ‘Publish’ or schedule the post and walk away, knowing that it has all the elements it needs. You’re done here.
7. Promoting
Batching your blog-promoting efforts is easy thanks to social scheduling tools like FlypChart, Hootsuite and Buffer. Using these, you can draft a series of tweets, Facebook posts or LinkedIn posts to go out at certain times after your post’s publication. You don’t even have to wait until after the post is published to do this – all these tools allow you to schedule tweets about yet-to-be-published posts.
For those who use Pinterest, there are also tools like BoardBooster or Tailwind that auto-share to these platforms.

Now, if you’ve been batching right down to the letter, you should already have several posts scheduled to be published on your blog. So you can schedule tweets, posts, and pins for all of them at the same time – how easy and time-efficient is that?
Of course, social media shouldn’t be your only blog promotion strategy. You can also batch some time to promote several blog posts at once by posting to industry forums, comment sections, social bookmarking sites and more. By searching for relevant threads to promote several blog posts at the same time, you can save hours compared to doing it again and again for each post.
Wrapping up
Now you know how to batch – that’s the easy part. Next, you need to make sure you actually do it. It’s easy to get caught up in day-to-day deadlines and abandon the strategy. Trust me, I’m speaking from experience! Anxiety creeps in, and you think, ‘I don’t have time to come up with a million blog ideas, I’ll just research and write the one post I definitely need to and develop a better system next week.’
Obviously, that defeats the whole purpose. That’s why I say you should take your batching as seriously as you would take a meeting with a client. Add set times to your calendar for different batching tasks throughout the month.
Yep, that’s right. Literally, put slots for ‘blog ideas’ and ‘promoting’ into your calendar. Because if you skip one component, the whole batching system can fall apart.
Give it a shot. Batching can honestly make it so much easier to speed up or outsource all sorts of tasks in your blog process. Start batching, and let me know how you go.


Thank you for the terrific article
I was looking for a system to help me to manage my blogging process and find your post very helpful. Thanks for sharing this!